
Updated June 18, 2025
So far in our HubDB series, we’ve covered that HubDB is a HubSpot tool that allows you to create tables to store data in rows, columns, and cells, much like a spreadsheet. You can customize a HubDB table's columns, rows, and other settings based on your needs. If you have any content that needs to be regularly updated, categorized, searched, or filtered on your website — such as team pages, events, resources, products, or services — you should strongly consider HubDB for your website.
If you’ve read along thus far, I’m going to assume you’re ready to start implementing HubDB on your website. So now, we’ll turn our attention to the specific setup procedures and considerations.
Top Takeaways
Getting Started With HubDB
Step 1: Navigate to HubDB & create a table

To get to your HubDB dashboard, go to Marketing > Files and Templates > HubDB
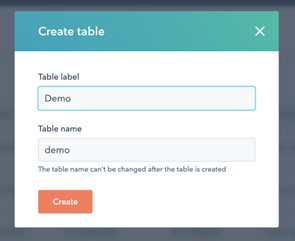
Give your table a label and code-friendly name.
Configure Your HubDB Table Settings
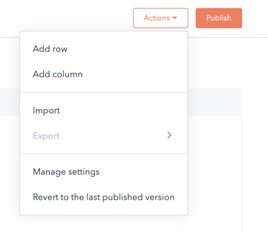
Manage your HubDB table’s settings by clicking Actions > Manage Settings
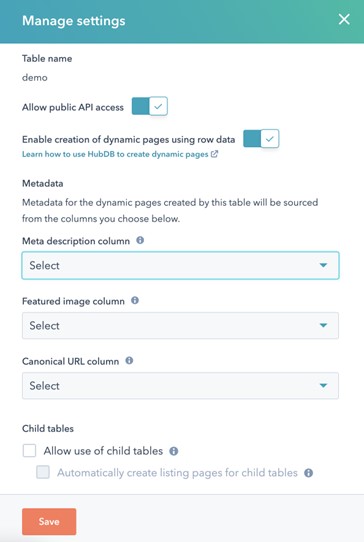
View of all settings available for HubDB tables
- Allow public API access: When this option is toggled off, your table contents can only be viewed in the app or with authenticated APIs. When toggled on, your table can be queried by unauthenticated APIs.
- Enable creation of dynamic pages using row data: With dynamic pages, HubDB allows you to create a page for every row in your table.
- When this option is toggled on, you will then be able to select columns of your HubDB table that will serve as the source for your Meta Description, Featured Image, and Canonical URL.
- If using dynamic pages, you can also choose to select Child Tables. We’ll talk more about child tables in an upcoming article about advanced HubDB implementation.
Step 2: Build out the columns

Determine what information needs to be stored for each row and map that to the most appropriate column type.
HubDB Column Types
- Text
- Rich-text
- URL
- Image
- Select
- Multi-select
- Date
- Date & time
- Currency
- Number
- Checkbox
- Location
- Foreign ID
- Video
Learn more about the location and foreign ID columns from our post covering real-world use cases for HubDB.
Step 3: Add your data

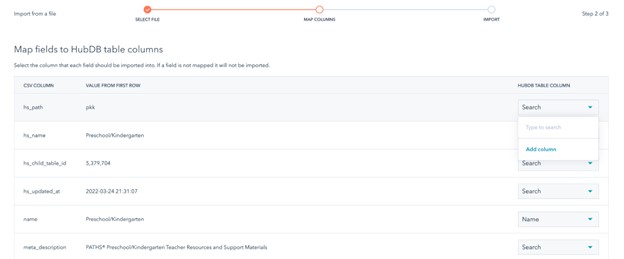
You can either add rows manually from the user interface or import the data from a CSV file.
How to Add Data to Your HubDB Table
- In the upper right, click Actions, then select Import.
- Click the Add or Replace tile:
- Add — will add rows from your spreadsheet to your existing data.
- Replace — will replace rows from your spreadsheet by overwriting and replacing any existing data in your table.
- Click Next, then Choose a file and then click Next again.
- Map each field from your CSV to the corresponding HubDB table column:
- Click the HubDB Table Column dropdown menu, then select a column from the table.
- If you haven't configured an associated column for the CSV field, click Add column, and in the dialog box, enter a label, name, and select a type.
HubDB CSV Import Formatting Considerations
When importing an image into a HubDB table, add the image's URL to the CSV file. To set dimensions for the image, add the width and height to the end of the URL, offset by commas. For example: http://www.hubspot.com/sample-image.jpg,100,300.
Imported dates must use MM/DD/YYYY formatting. For example, September 18th, 2022 would be 09/18/2022.
Step 4: Publish your table
Hit Publish & confirm to update your data everywhere.
Use HubDB Data in a Custom Module
HubDB table fields allow a content creator to designate a HubDB table source. This field type returns the table id, which you can use with the HubDB HubL functions.
HubDB row fields allow a content creator to select an individual row (or rows if using repeater fields) from a defined table. You can then use this field to create user-defined lists, tables, resources, and more.
Create Dynamic Pages with HubDB Data
Dynamic pages are CMS pages that get their content from a structured data source, such as HubDB or CRM objects. Based on how you configure your dynamic page template or modules, HubSpot will then use that data to automatically create and populate a set of pages. This includes a listing page that displays summaries of the data and individual pages for each data source entry (HubDB row or CRM object record).
Dynamic Templates
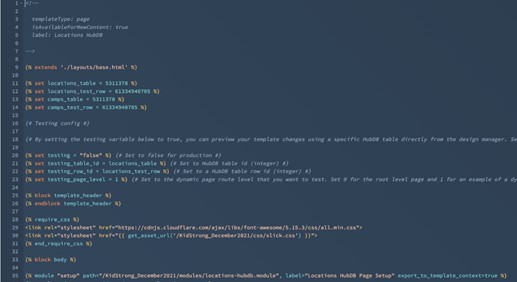
Let’s briefly look behind the scenes at the code for our dynamic templates. If this part is too technical, let our developers set you up for success with a custom HubDB implementation for your website.
Testing Parameters
Fetching Rows
Dynamic Pages
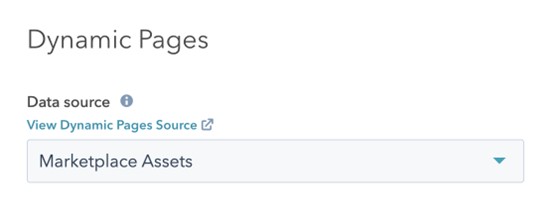
Now that we have a template created, we need to use it on a page. To create a dynamic page from your template:
- Select the template you created, then click the Actions dropdown menu & Create page.
- In the dialog box, select Website page and enter a page name, then click Create page.
- At the top of the page editor, click the Settings tab.
- Click Advanced Options to expand additional settings.
- Scroll down to the Dynamic pages section, then click the Data sources dropdown menu. Select the HubDB table you created.
Keep reading about HubDB
- Feeling a little lost? Check out the first article in this series for a brief introduction to HubDB: The Most Powerful HubSpot Tool You're Probably Not Using Yet
- Check out some Real Case Studies That Showcase the Power of HubDB in the second article in this series.
- Later in the series, get ready for some advanced concepts! You'll learn how to join two or more HubDB tables.
.webp?width=100&height=100&name=10%20Signs%20Your%20HubSpot%20Setup%20Is%20Failing%20(+%20Fixes).webp)
%20Actually%20Tell%20You.webp?width=100&height=100&name=What%20HubSpot%E2%80%99s%20Buyer%20Intent%20Tool%20Can%20(and%20Can%E2%80%99t)%20Actually%20Tell%20You.webp)
